Wednesday, March 21, 2012

Week Old Chicks (Time to expand)

The chicks are a week old now and I also added 4 baby Peking Ducks so I did expend their brooder a bit and moved the cardboard addition a few inches out.  They have now tested out running.  The ducks are also enjoying their new home and trying to figure out how to bath in the waterer.  They are getting more feathers now but of course there is no way to yet tell if I have any boys in the crew.  I do have one that is straight run so time will tell.   The ducks are all straight run so my HOPE is that I have three girls and a boy...that of course prob isn't the case so we will see what happens.  Here are some pictures of the crew at one week of age.  The ducks are just under a week.

OUR DUCKLING ADDITIONS

EXPANDING THE BROODER (ITS ABOUT 4X4 FOOT NOW, MAYBE A LITTLE SMALLER)

Pasty Butt in Chicks (how to treat) Pictures included

Pasty Butt...what is it?  All it is is poo built up over a few days on your chicks vent area.  If this goes untreated they will die.  The poo turns very solid (almost cement feeling) and the chicks are no longer able to poop and will die a slow miserable death so PLEASE don't let this go untreated.  If you are scared to do it yourself ask someone else who may have chickens to help you After about two weeks they will grow out of that and you won't have to worry about it.  And only a few will get it.  It is very common in Cochins.  

What you will need: 

  1. Paper towel (just a few sheets)
  2. A rubber glove
  3. Warm water (I use my utility sink in the laundry room)

What you need to do is run your water until it's warm...testing it at your wrist to be sure it's not too hot.  Run the vent area under the water while working the poo with your gloved hand.  What I do is try to gently squeeze the poo until it starts to break lose.  Be sure you do not squeeze too hard, you don't want to pull their feathers out in that area.  This may take a good 5 min of continuously working the poo lose.  After 5 min give the chick a little rest for a min (not long enough to UNDO what you have already done) you want it to stay soaked so don't leave it too long.  This should be plenty of time though.  Once you got it all off wrap them in a paper towel to soak up all the water and dry them the best you can then add a little olive oil on their vents and this will help it from happening again.  Then you can put them back in the brooder.  If they are still a little wet that's ok...they will dry pretty quickly under the heat lamp.  Here is a before and after picture of Pasty Butt:  These pictures are just after a few days so you can see how fast this can happen so be sure to check them daily.

PASTY BUTT (BEFORE)


PASTY BUTT (AFTER)

Monday, March 19, 2012

Picking up Baby Chicks and the Post Office (Unboxing)

REMINDER: When ordering chicks be sure that you call your Post Office a week before your chicks will be delivered.  Usually your phone number will be on the box but you never know when something may happen and the phone number gets blurred etc. 

Have your brooder ready to go BEFORE the chicks arrive...they are going to be hungry/thristy, and cold.  Get them under a 250 watt heat lamp as soon as you can (after dipping each of their beaks in water (see descriptions below) )   So, here we go...this is what you can expect when picking up your chicks :D


The box the 25 chicks come in will be the size of a standard sheet of paper.


The sides will be stapled to hold on the cover.  Just simply lift those up and remove the cover.


This is the underside of the lid, sorry it ended up upside down but you get the idea :D It will have all the chicks you ordered so you can double check that you got what you ordered.  If you order from Ideal theirs will be in a plastic wrap at the top of the box.  This one is from McMurray's.


Under that cover you will find sweet baby chicks (25 of them)  Even if you do not order 25 chicks most places will add males for warmth.  So if you order 20 chicks they will add 5 roos in there with them.  


We ALWAYS get curious eyes after hearing all the peeping!  :D


This is what your new chick area should look like.  This is a huge brooder 3X8 but we used cardboard boxes to partition off a small area until the chicks know what and where their food and water is.  They will be ok in this area for about a week.  Be sure to lay paper towel over the pine shavings for the first two days.  If you don't they WILL eat pine shavings and may not find their food and water.  It's not gonna hurt them to eat some pine shavings but they NEED to get to the food as well.


This is what the entire brooder looks like so as they grow (I plan on keeping them in here until six weeks) I can remove the cardboard and allow them more access to their area slowly.  I have tape over the slats in the cardboard so they are not able to get through.  We also piled up pine shavings along the back side so no going under it either.


These are some happy chicks and they have found their water and food just fine.  Be SURE to dip each one of their beaks into the water to ensure they know what it is.  Remember YOUR their mommy and when they are hatched by a hen she teaches them how to drink...when you order them through the mail YOU have to teach them. It's very important that you do this.  Don't skip this part!  Take each out of the mail box one by one and as you add them to the brooder dip their beaks...that way you know which ones you have done.


You ever wonder what your chicks will be ON during their transit to your home?  This is it...it's a meshed flat hay sheet.  and under that is a piece of Styrofoam for warmth (below).  If you ordered a progel which I hope you have, then it will be stuck in the side behind the corrugated cardboard inside the chick box.


Always add a Probiotic to their water for the first few days.  Get a gallon sized waterer and one packet is dumped into that.  It's simple, and it really helps the chicks get off to a great start (along with their ProGel) after that gallon of water is gone there is no need to add more right away.  If it gets cold out or if they seem to be feeling down add some to their next gallon.  You can get Probiotics just about anywhere, I got mine at my local feed store.  Fleet farm carries probiotics as well.

Now, go enjoy your chicks!  I can guarantee your gonna spend many hours just watching them.  Be sure to have a chair handy so you can relax :D 

Sunday, March 18, 2012

Making a Brooder (Directions and Pictures)


We wanted a brooder box that could be easily taken apart and stored when not needed then quickly re-assembled the next spring.  My husband came up with a design that just slides together, and when done, pulls back apart.  Once built no tools are needed to assemble or dis-assemble.

Since this brooder sits directly on a concrete floor, there is no floor in it.  We do have pine shavings down but didn't see much point in adding a plywood floor.  If you feel you must have one, you could cut a 3rd sheet down to exactly fit the inside of the box.


List of things you will need:

  • 2 4X8 sheets of 5/8 inch plywood (we used cheaper OSB we had lying around.)
  • 32 drywall screws (one inch)
  • Wood Glue
  • 3 1X2's Furring strips (used for reinforcement so you can use stuff you have laying around if you have, we ripped board to fit ours instead of buying the wood)
Tools:
  • Skill Saw
  • Straight Edge and clamps would be helpful but not absolutely required
  • Pencil/ruler
  • Wood Chisel 
  • Hammer
  • Electric Screw driver/ Drill / drill bits
  • Hand saw or Jig Saw

  1. Cut one sheet of plywood in 1/2 lengthwise so we had (2)  2 foot x 8 foot long sheets of plywood. (The sheets will actually be slightly less than 2' because of the width of the saw blade.)
  2. On the second sheet cut off 41 inches off of one end. 
  3. Cut that in half so we had (2) 2 foot x 41 inch boards now. This leaves you with over 1/2 sheet of plywood form a future project.
  4. Cut furring strips into 2' lengths (actually slightly under 2'... measure them against the sheets of plywood you have cut.)
  5. Measure in from one end of a cut sheet of plywood equal to the thickness of your furring strips. (Hold a piece of furring strip against the edge and mark the other side of it with your pencil.)
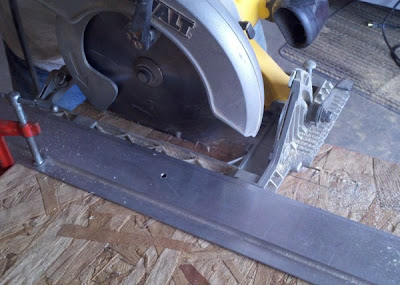
  6. Use your skil saw to make a 1 foot long cut.  We clamped a straight-edge to the plywood to make sure cuts were accurate and straight.  If you have a good eye you may be able to do this free-hand.  The better the notches, however, the tighter everything will fit together in the end.
  7. Mark a 2nd line 5/8 of an inch from the edge of your first cut. 
  8. Cut the second side of the notch (again it will be a cut 1' long.) (Keep the thickness of your saw blade in mind... typically 1/8 of an inch.)
  9. The Skil saw blade will not cut all the way to the 1 foot mark on the bottom of the board.  Use a jig saw or hand saw to finish the two cuts to 12" all the way through the board.
  10. Use a hammer and chisel to finish up the end and remove any extra plywood. 

  11. Now is a really good time to make sure your slot is cut the right size.  Take the bit of plywood you just removed, turn it on its side and see if it fits snugly. (If you have to force it, it is too tight.)
  12. Next we sanded the OSB where the reinforcement boards were going to be glued.  OSB is rough and doesn't lend itself well to a good glue bond.  We also sanded off any burs or slivers around the cut-out notch.
  13. Mark the board for four evenly spaced screws. We marked 1-1/4", then 7-1/4" from that, 7-1/4" again, and then 1-1/4" from the end. Because the furring strips were 1-1/2" wide, the center for positioning the screws is 3/4" from the edge.
  14. Pre-drill the plywood with a drill bit which is the same width as your screws. This allows the screw to pull the furring strip tight to the plywood later. (Plus OSB isn't very tough stuff.) My father-in-law is a stickler for detail so he also dimpled the screw hole so the screw heads would be flush.


    Note: This dimple was on the opposite side from where the sanding was done.
  15. Flip sheet of plywood so sanded side is down. Set on extra bits of furring strip so it sits level when a piece of the cut furring strip is in place under the end.
  16. Add glue.

  17. Position furring strip and screw into place (careful not to over-tighten.)

  18. Repeat for other end of this sheet.
  19. Repeat for all four sheets.
  20. Set out the long sides with slots facing up.  Slide the shorter ends over these (slots facing down.)  An get everything ready for the new chicks.

A Chick Brooder (how to, does it work?)

Today we are starting out with making our makeshift brooder.  Something we can take apart and put away after hatch season, oh wait, does hatch season ever end???  Well, for me, it HAS to end but for some, it really doesn't :D  
Anyway, were making this about 4X6 or 3X8 (haven't fully decided yet) and my hope is that this will hold the chicks for almost up to six weeks of age (these are standard LF chicks).  I want to keep them as separate from the big ladies as I can until they are strong enough to overcome anything the older ladies are carrying around with them.  You know...those, sometimes hidden, diseases like Mereks...they say it's VERY common in chickens and if you have chickens you have to assume you have Mereks.   I'm just not taking that chance so separate they will remain until they are older and the vaccine has a chance to take effect. 

So what we have are two large sheets of plywood (4X8), six 1X2 (for the screened cover (directions to come later))  and some hardware (will post more about that later) and of course pine shavings, a heat lamp with bulb, feeder, waterer, some vitamins for the first week, chicken starter, water, paper towel for two days (laid on top of the pine shavings for first two days) and some baby grit (for later).  Will try to get pictures as we go just in case this turns out to be an awesome thing :D 
This is my first time actually making a brooder.  Usually I just use the watermelon boxes (3.5X 4.5 feet) but the stores have been making it so impossible to get them, I got tired of the chase! Yes it was free, and YES it worked WONDERFULLY (keep in mind this does NOT hold 25 chicks for a full six weeks...too small, but it does hold them for about 4 weeks just fine) but...I'm just not into chasing around anymore so were finally gonna break down and make one!!  Will add some pictures by the end of the day on our adventure.

Saturday, March 17, 2012

Heat Bulb (only one I will use)

GE 250 Watt Red heat Lamp


I purchased this from Menards for $8.47 VS the $3.47 for the cheaper one... however, it does indeed last much longer then the cheaper one so it's worth the money knowing I don't have to worry about it burning out in a month or so. 


Published with Blogger-droid v2.0.4

OMG they have to go OUTSIDE?

This is what I thought when I raised my first batch of chicks almost six years ago!  Today it's a lot different, I love them the same but not as CRAZY about how I see things when it comes to caring for them and putting them outside.  For example:  I ordered chicks a while back and today I got the email saying "Your order has shipped".  Well, I'm not ready and I'm not freaking out about it either :D  Hubby and I are putting together a brooder and we have two days to do it.  We can get it done even though I do have to work both days this weekend, were ok.  

I AM kind of shocked that they sent the chicks out on a Sat morning though since Sun all they will be doing is sitting in the P.O?  I was under the impression that they were to be sent out on Monday.  I guess it is what it is though and I have to make the best of it.  So I'm expecting them to reach me ON Monday now. 

Back to the brooder:  I have made make shift brooders before, from plastic totes (NOT a good idea, and for me it made it a day)  all the way up to huge watermelon boxes which worked great but I was tired of fussing with the stores trying to FIND one every spring!  SO I have decided to enlist my hubby and have him build me a nice one that I can take apart each fall and bring out again each spring.  I will take pics and post them here when we are in full swing.  Until then I have to finish work and get my self to the feed store so I have food for my babies.  Six years ago this would have all been done 5 weeks PRIOR to my chicks even  being shipped!  HAHA   Back with more info later on. Oh and there will be LOTS of pictures in this blog as well.