We wanted a brooder box that could be easily taken apart and stored when not needed then quickly re-assembled the next spring. My husband came up with a design that just slides together, and when done, pulls back apart. Once built no tools are needed to assemble or dis-assemble.
Since this brooder sits directly on a concrete floor, there is no floor in it. We do have pine shavings down but didn't see much point in adding a plywood floor. If you feel you must have one, you could cut a 3rd sheet down to exactly fit the inside of the box.
List of things you will need:
- 2 4X8 sheets of 5/8 inch plywood (we used cheaper OSB we had lying around.)
- 32 drywall screws (one inch)
- Wood Glue
- 3 1X2's Furring strips (used for reinforcement so you can use stuff you have laying around if you have, we ripped board to fit ours instead of buying the wood)
- Skill Saw
- Straight Edge and clamps would be helpful but not absolutely required
- Pencil/ruler
- Wood Chisel
- Hammer
- Electric Screw driver/ Drill / drill bits
- Hand saw or Jig Saw
- Cut one sheet of plywood in 1/2 lengthwise so we had (2) 2 foot x 8 foot long sheets of plywood. (The sheets will actually be slightly less than 2' because of the width of the saw blade.)
- On the second sheet cut off 41 inches off of one end.
- Cut that in half so we had (2) 2 foot x 41 inch boards now. This leaves you with over 1/2 sheet of plywood form a future project.
- Cut furring strips into 2' lengths (actually slightly under 2'... measure them against the sheets of plywood you have cut.)
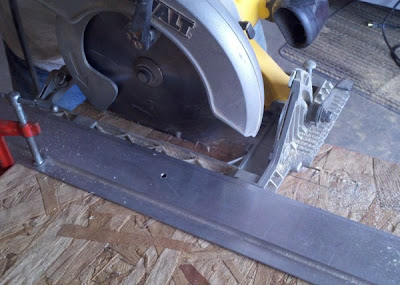
- Measure in from one end of a cut sheet of plywood equal to the thickness of your furring strips. (Hold a piece of furring strip against the edge and mark the other side of it with your pencil.)
- Use your skil saw to make a 1 foot long cut. We clamped a straight-edge to the plywood to make sure cuts were accurate and straight. If you have a good eye you may be able to do this free-hand. The better the notches, however, the tighter everything will fit together in the end.

- Mark a 2nd line 5/8 of an inch from the edge of your first cut.
- Cut the second side of the notch (again it will be a cut 1' long.) (Keep the thickness of your saw blade in mind... typically 1/8 of an inch.)
- The Skil saw blade will not cut all the way to the 1 foot mark on the bottom of the board. Use a jig saw or hand saw to finish the two cuts to 12" all the way through the board.

- Use a hammer and chisel to finish up the end and remove any extra plywood.


- Now is a really good time to make sure your slot is cut the right size. Take the bit of plywood you just removed, turn it on its side and see if it fits snugly. (If you have to force it, it is too tight.)
- Next we sanded the OSB where the reinforcement boards were going to be glued. OSB is rough and doesn't lend itself well to a good glue bond. We also sanded off any burs or slivers around the cut-out notch.

- Mark the board for four evenly spaced screws. We marked 1-1/4", then 7-1/4" from that, 7-1/4" again, and then 1-1/4" from the end. Because the furring strips were 1-1/2" wide, the center for positioning the screws is 3/4" from the edge.

- Pre-drill the plywood with a drill bit which is the same width as your screws. This allows the screw to pull the furring strip tight to the plywood later. (Plus OSB isn't very tough stuff.) My father-in-law is a stickler for detail so he also dimpled the screw hole so the screw heads would be flush.


Note: This dimple was on the opposite side from where the sanding was done. - Flip sheet of plywood so sanded side is down. Set on extra bits of furring strip so it sits level when a piece of the cut furring strip is in place under the end.
- Add glue.

- Position furring strip and screw into place (careful not to over-tighten.)


- Repeat for other end of this sheet.
- Repeat for all four sheets.
- Set out the long sides with slots facing up. Slide the shorter ends over these (slots facing down.) An get everything ready for the new chicks.


No comments:
Post a Comment